ShopDreamUp AI ArtDreamUp
Deviation Actions


Suggested Deviants


Suggested Collections


You Might Like…


Description
Stock Removal Tutorial: [link]
Heat Treating Tutorial: [link]
Blade Antiquing: [link]
Knife Handle Tutorial: [link]
Handle Texturing.
My rambling; So! What's happening? That's cool, I see living people as well. It's pretty depressing, trust me I know.
Now then! Like everything else that goes with making a knife or skinning cats; there is more than one way to do it. Texturing a handle mean all kinds of stuff and things. Also things that are stuff and etc.
Texturing usually means taking a smooth surface of the knife, whether its the handle, guard, or blade, and basically making it more 3-D. By that I mean when you look at a handle and it's smooth, you really only see the height and width of the handle. With texturing we give the handle some depth. It can be controlled areas with very few lines to make it have a better grip or it can be aesthetic with varying depths.
Usually on tactical knives or micarta & G10 handles in general, we are texturing the handle in order to give it more grip. The good thing is as a maker you really can't go wrong, because it is what you want it to be. You can go with very few and simple lines like on Chris Reeve's Pacific model that has three notches in the handle, you can texture the whole handle like Busse combat knife company's Boss Jack. The list goes on from short and simple to extreme and complicated textured knife handles.
There are suppliers that make handles that are already textured. So all you would have to do is order them and put them on your knife then just make sure that you don't remove too much of the material when shaping the knife. Me personally, I order my handle material in large sheets. Since my handle style varies so much.
My tactical handles usually have three styles:
1) Checkered- The section that I'm texturing is cut into diamond shapes. Most custom checkered handles have small diamond shapes that have a point in the center of the diamond. It makes for a more elegant and complex look while adding to the grip.
2) Grooved- Are what I call the type of texture on the two knife examples I said earlier. It's usually long, wide half circle cuts that go the wide of the handle, sometimes at an angle. It's what I most commonly see on combat knives that are textured.
3) Ripple- This is my tuxedo style texture for tacticals. The reason I say this is because its more of my carved type texture, that looks like Blood Eater's scales mixed with
Avatar's wings. To make a ripple looking effect through the handle.
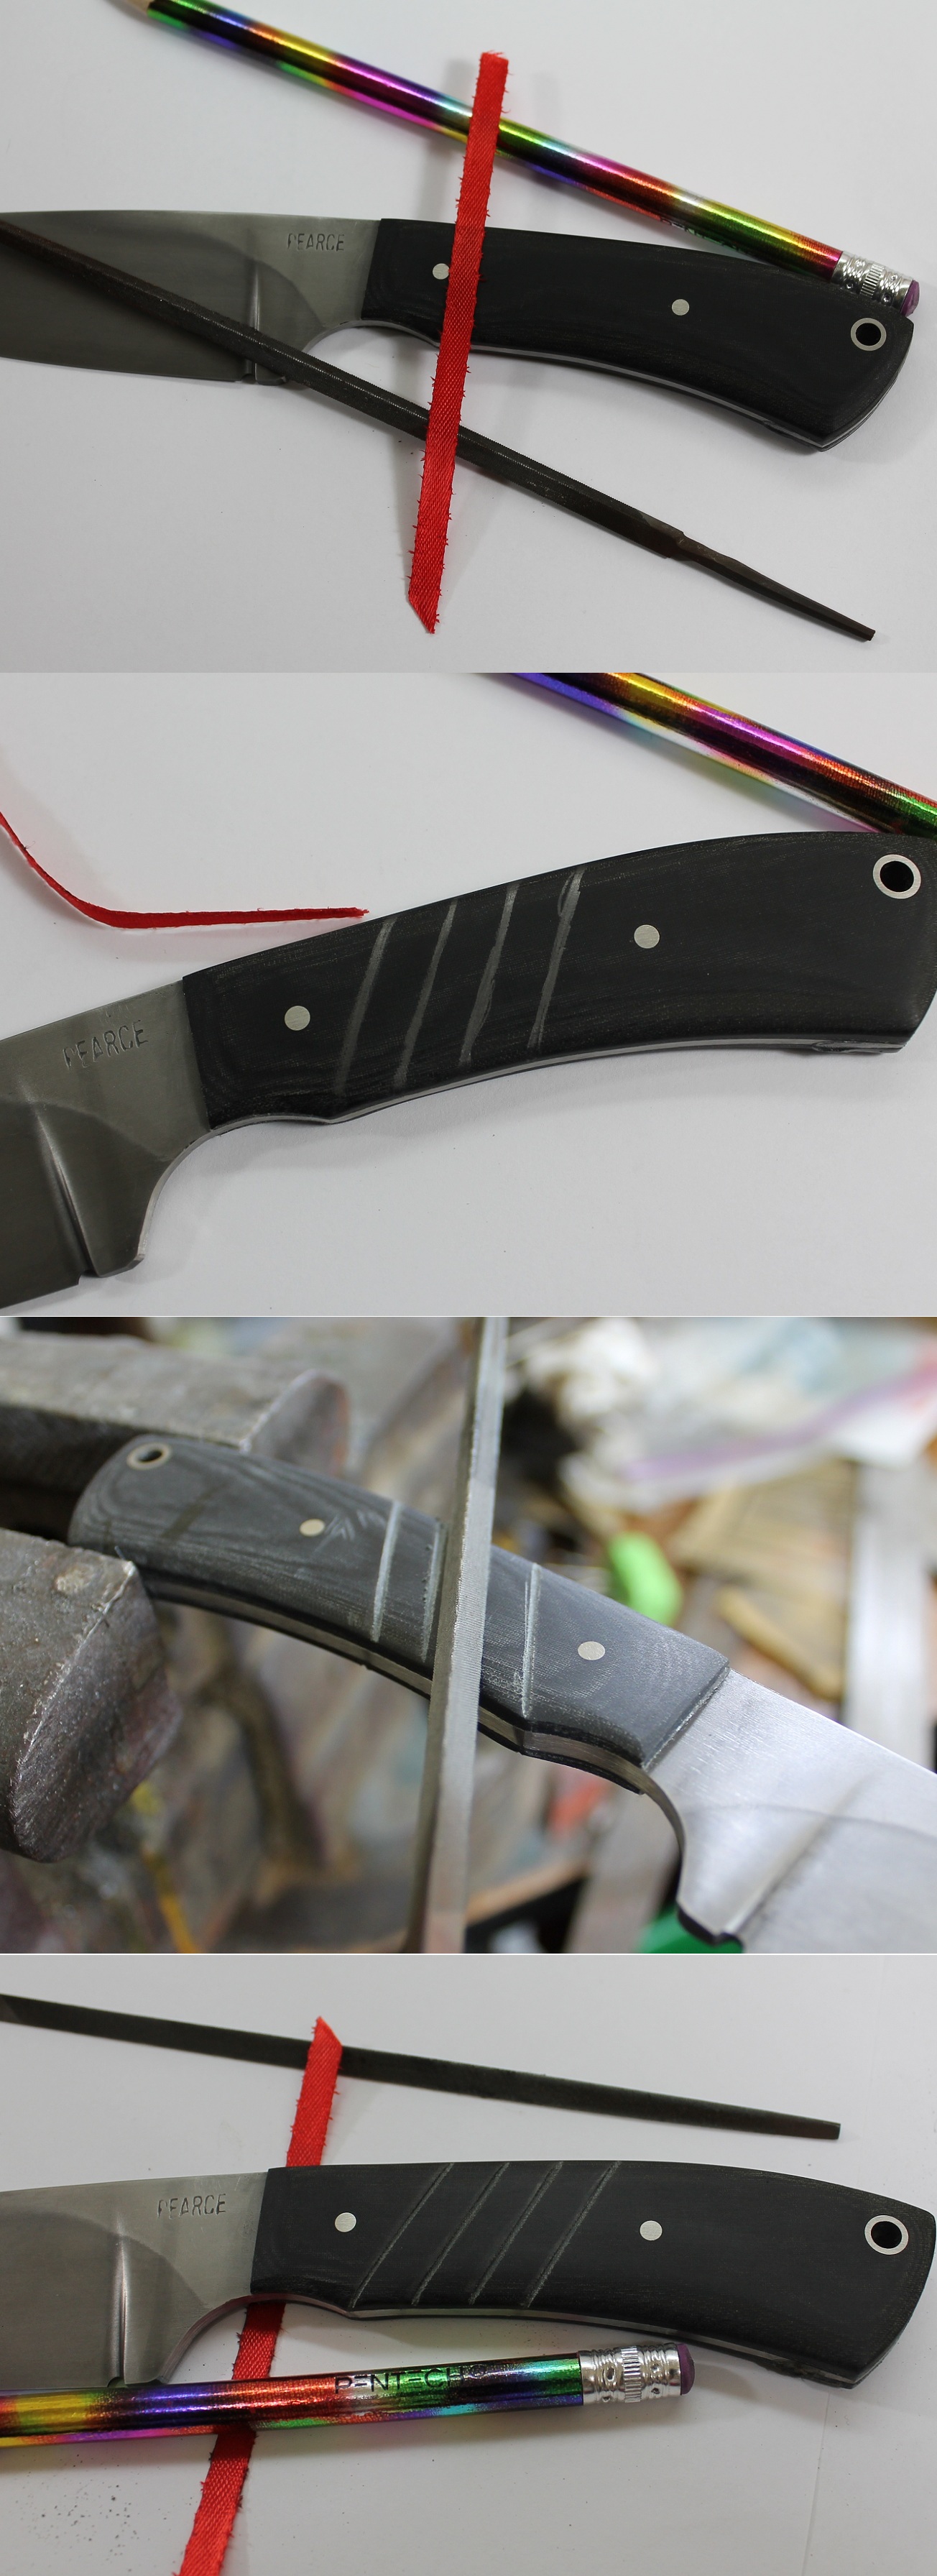
For this tutorial I will be doing a large version of the checkered style. This was how I first started practicing checkering knives. It helped me to become better at doing the smaller more intricate checkering.
Step 1: First Cuts.
For this I will be using a triangle file, 4mm piece of lace, and a hawt looking pencil that I know everyone is jealous of.
Since I'm going for simple, I don't want the texture to take up a whole lot of my knife. I want it to play a part in the look and help add to the grip. For this one, I've selected the section between the first two pins.
The reason I do this is because I know that it will be the same on both sides. They stand as landmarks for me, when lining up the design. While this isn't really for looks as much as it is for usability, you still want to do your best work on it. Lines that don't match up on both sides can make for a bad review of your ability.
Then again we are using a piece of lace to measure with.")
I decide what angle I want the lines to go in by placing the edge of the lace against the outer edge of the first pin. For this knife it helps that I put a finger groove on it. This helps me to line up the lines on the opposite side later. Once the first mark is made, I move the lace to line up with the marked line and make another one.
Here I have four lines, I could probably get another one in, but it would be too close to the pin for me to be comfortable with.
Taking my triangle file, I start cutting along the line. If you have followed along this knife's tutorial, then you know the handle has already been shaped. Our lines at this point really don't need to be very deep. The cuts are more of starter cuts.
Once all of the lines have been cut and we are happy with the way they look, then we can make them a little deeper. Just remember that we can go over the lines at any time, so there is no need to go too deep yet.
Now we flip the knife and do the same thing to the other side. Doing our best to keep everything lined up with the other side.
Next Step:
Logan Pearce
www.pearceknives.com
Facebook-> [link]
Heat Treating Tutorial: [link]
Blade Antiquing: [link]
Knife Handle Tutorial: [link]
Handle Texturing.
My rambling; So! What's happening? That's cool, I see living people as well. It's pretty depressing, trust me I know.
Now then! Like everything else that goes with making a knife or skinning cats; there is more than one way to do it. Texturing a handle mean all kinds of stuff and things. Also things that are stuff and etc.
Texturing usually means taking a smooth surface of the knife, whether its the handle, guard, or blade, and basically making it more 3-D. By that I mean when you look at a handle and it's smooth, you really only see the height and width of the handle. With texturing we give the handle some depth. It can be controlled areas with very few lines to make it have a better grip or it can be aesthetic with varying depths.
Usually on tactical knives or micarta & G10 handles in general, we are texturing the handle in order to give it more grip. The good thing is as a maker you really can't go wrong, because it is what you want it to be. You can go with very few and simple lines like on Chris Reeve's Pacific model that has three notches in the handle, you can texture the whole handle like Busse combat knife company's Boss Jack. The list goes on from short and simple to extreme and complicated textured knife handles.
There are suppliers that make handles that are already textured. So all you would have to do is order them and put them on your knife then just make sure that you don't remove too much of the material when shaping the knife. Me personally, I order my handle material in large sheets. Since my handle style varies so much.
My tactical handles usually have three styles:
1) Checkered- The section that I'm texturing is cut into diamond shapes. Most custom checkered handles have small diamond shapes that have a point in the center of the diamond. It makes for a more elegant and complex look while adding to the grip.
2) Grooved- Are what I call the type of texture on the two knife examples I said earlier. It's usually long, wide half circle cuts that go the wide of the handle, sometimes at an angle. It's what I most commonly see on combat knives that are textured.
3) Ripple- This is my tuxedo style texture for tacticals. The reason I say this is because its more of my carved type texture, that looks like Blood Eater's scales mixed with
Avatar's wings. To make a ripple looking effect through the handle.
For this tutorial I will be doing a large version of the checkered style. This was how I first started practicing checkering knives. It helped me to become better at doing the smaller more intricate checkering.
Step 1: First Cuts.
For this I will be using a triangle file, 4mm piece of lace, and a hawt looking pencil that I know everyone is jealous of.
Since I'm going for simple, I don't want the texture to take up a whole lot of my knife. I want it to play a part in the look and help add to the grip. For this one, I've selected the section between the first two pins.
The reason I do this is because I know that it will be the same on both sides. They stand as landmarks for me, when lining up the design. While this isn't really for looks as much as it is for usability, you still want to do your best work on it. Lines that don't match up on both sides can make for a bad review of your ability.
Then again we are using a piece of lace to measure with.
I decide what angle I want the lines to go in by placing the edge of the lace against the outer edge of the first pin. For this knife it helps that I put a finger groove on it. This helps me to line up the lines on the opposite side later. Once the first mark is made, I move the lace to line up with the marked line and make another one.
Here I have four lines, I could probably get another one in, but it would be too close to the pin for me to be comfortable with.
Taking my triangle file, I start cutting along the line. If you have followed along this knife's tutorial, then you know the handle has already been shaped. Our lines at this point really don't need to be very deep. The cuts are more of starter cuts.
Once all of the lines have been cut and we are happy with the way they look, then we can make them a little deeper. Just remember that we can go over the lines at any time, so there is no need to go too deep yet.
Now we flip the knife and do the same thing to the other side. Doing our best to keep everything lined up with the other side.
Next Step:
Logan Pearce
www.pearceknives.com
Facebook-> [link]
Image size
1304x3584px 865.49 KB
Make
Canon
Model
Canon EOS REBEL T3
Shutter Speed
1/64 second
Aperture
F/5.0
Focal Length
37 mm
ISO Speed
100
Date Taken
Oct 27, 2011, 7:31:54 PM
Lens
EF-S18-55mm f/3.5-5.6 IS II
Sensor Size
17mm
© 2011 - 2024 Logan-Pearce
Comments5
Join the community to add your comment. Already a deviant? Log In
i've been following these tutorials and the result is amazing, but i have a questio, what kind of material is that you use for the handle? (i couldn't find it on the description)