ShopDreamUp AI ArtDreamUp
Deviation Actions


Suggested Deviants


Suggested Collections


You Might Like…


Featured in Groups


Description
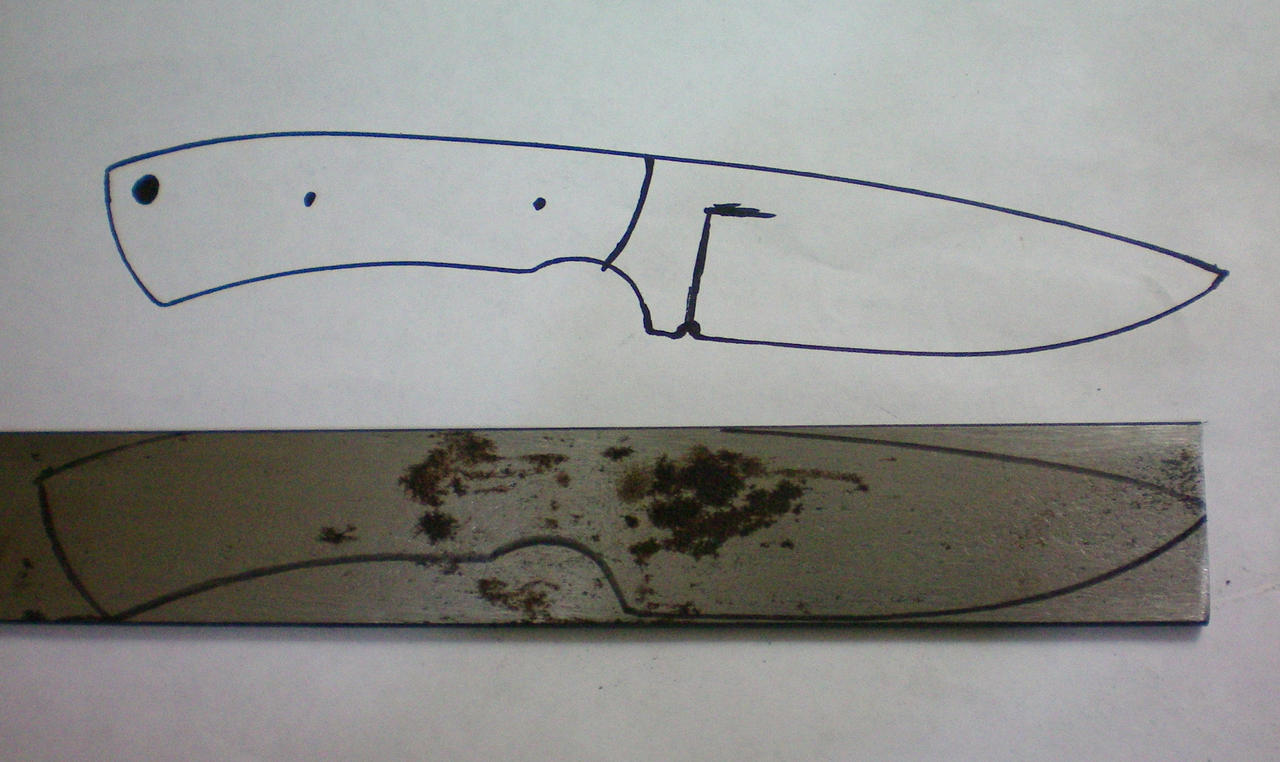
OAL: 8 3/4"
Blade Length: 4"
A quick sketch of the knife I'll be making for the tutorial. The metal I will be using is 3/16" thick 1080 that had the scale removed on it by the machine shop I got it from. It's been laying around my shop for months now and has some rust on it, but that won't matter once we get started.
Depending on which metal you get and where it is from it will probably have the scale on it still. I think precision ground metal is usually $1 more or something than the metal with scale on it. In all seriousness it is definitely worth the dollar or so for it, if you do not have a grinder. If you do have a grinder or are forging the blade out, then precision ground is basically a waste. Since you'll be putting a scale on it while forging and while grinding it usually only take a minute to get the scale off.
It is worth noting that if you got 1/8" thick metal and do not plan on tapering the tang AND you are not planning on forging the metal, then I would go with precision ground metal, as the sides will be perfect for putting scales on for the handle as long as you don't mess it up. Some people prefer it that way, it makes things a lot easier, but if its a heavier knife and you are trying to balance the blade out you will most likely want to taper the tang for weight reasons as well as the professional look.
As you can see the design is simple. It is thick, but I wanted to use as much of the metal as I could. It's curved to take up more of the metal, which in turn will make life easier on us when we start cutting and filing away at it. It also makes the knife feel better when handling it. While the main objective is to make sure it feels good and is aesthetically pleasing to the eye, you still want to think about the work going into it. This design does a pretty good job of covering all three sections of my design process.
Also, I've posted a majority of the tools that I'll be using the make the knife. They are in my scraps or you can go to them individually here:
[link]
[link]
[link]
[link]
[link]
[link]
[link]
All of these are easily obtained and pretty cheap tools. The main ones needed are the vise, hand saw, files, sanding paper, and the handle parts. Of course a good heat source as well, but that will all be discussed later. I actually won't be using the torch I posted, as I'll be able to access my forge before getting to the hardening and tempering of the knife. Still with a blade around 4" it shouldn't be difficult to harden the blade.
Next Step: [link]
Watch and see~ I will become the greatest. (Wink)")
Logan Pearce
www.pearceknives.com
Blade Length: 4"
A quick sketch of the knife I'll be making for the tutorial. The metal I will be using is 3/16" thick 1080 that had the scale removed on it by the machine shop I got it from. It's been laying around my shop for months now and has some rust on it, but that won't matter once we get started.
Depending on which metal you get and where it is from it will probably have the scale on it still. I think precision ground metal is usually $1 more or something than the metal with scale on it. In all seriousness it is definitely worth the dollar or so for it, if you do not have a grinder. If you do have a grinder or are forging the blade out, then precision ground is basically a waste. Since you'll be putting a scale on it while forging and while grinding it usually only take a minute to get the scale off.
It is worth noting that if you got 1/8" thick metal and do not plan on tapering the tang AND you are not planning on forging the metal, then I would go with precision ground metal, as the sides will be perfect for putting scales on for the handle as long as you don't mess it up. Some people prefer it that way, it makes things a lot easier, but if its a heavier knife and you are trying to balance the blade out you will most likely want to taper the tang for weight reasons as well as the professional look.
As you can see the design is simple. It is thick, but I wanted to use as much of the metal as I could. It's curved to take up more of the metal, which in turn will make life easier on us when we start cutting and filing away at it. It also makes the knife feel better when handling it. While the main objective is to make sure it feels good and is aesthetically pleasing to the eye, you still want to think about the work going into it. This design does a pretty good job of covering all three sections of my design process.
Also, I've posted a majority of the tools that I'll be using the make the knife. They are in my scraps or you can go to them individually here:
[link]
[link]
[link]
[link]
[link]
[link]
[link]
All of these are easily obtained and pretty cheap tools. The main ones needed are the vise, hand saw, files, sanding paper, and the handle parts. Of course a good heat source as well, but that will all be discussed later. I actually won't be using the torch I posted, as I'll be able to access my forge before getting to the hardening and tempering of the knife. Still with a blade around 4" it shouldn't be difficult to harden the blade.
Next Step: [link]
Watch and see~ I will become the greatest.
Logan Pearce
www.pearceknives.com
Image size
2621x1560px 1.79 MB
Make
EASTMAN KODAK COMPANY
Model
KODAK EASYSHARE M873 ZOOM DIGITAL CAMERA
Shutter Speed
1/56 second
Aperture
F/3.1
Focal Length
6 mm
ISO Speed
160
Date Taken
Aug 17, 2007, 2:43:24 PM
© 2011 - 2024 Logan-Pearce
Comments14
Join the community to add your comment. Already a deviant? Log In
This tutorial was really good, the only thing I am not seeing is what type of files to use, I know i used a jewelry file on tool steel and I guess i didn't do something right when doing so and hardened the steel-which happened to be an older file i hammered a bit first. Is the steel you work with pre-softened or something? I was using a small gas forge to get the steel glowing yellow-orange before hammering but I guess that hardened it a bit too much for a file? 